The basics of training with power meter.

Power meter technology has long been a part of cycling training. Just a few years ago, power meters were less accessible, and knowledge about power-based training was much more limited. Today, more cyclists have power meters and regularly use them in their training plans.
How do you start power-based training, and what concepts are worth knowing in order to make full use of your training data? I will answer these questions in this article.
What about your heart rate?
I will start unusually – by emphasising the importance of heart rate measurement in power-based training. In my experience, people who start training with a power meter often give up monitoring their heart rate or stop paying attention to it. This is a big mistake.
Having data from both a power meter and a heart rate monitor allows you to understand much better what is happening to your body during exercise. This gives you a more complete picture of the adaptive changes taking place in your body as a result of training and greater control over its effectiveness. Later in this article, I will present an indicator that combines heart rate and power, which is worth monitoring during certain workouts.
Why is it worth basing your training on power meter?
Power-based training is precise, objective and provides immediate feedback on the effort exerted – unlike heart rate measurement, where the body’s response is delayed. Power meter allows you to precisely control intensity, plan training sessions and analyse progress, regardless of external conditions or your current physical condition. This makes it easier to tailor your training to your individual goals, depending on what you want to work on at any given moment.
How to begin?
I recommend treating the first few days after installing the power meter as a familiarisation period. Do not change anything in your current training routine – just glance at the power values from time to time while riding, and analyse the saved file after training. This is a calm stage of getting used to how power behaves while riding and what it actually shows. The power readings may seem chaotic at first, mainly due to the difficulty in maintaining a stable value. Therefore, it is worth giving yourself at least 3-5 training sessions to adapt before moving on to the next stage, i.e. performing a test to determine your Functional Threshold Power (FTP). Based on your FTP, you can then determine your individual intensity zones, which will be used for precise training planning.
What exactly is FTP?
FTP is the highest average power you can sustain for 60 minutes.
This is the simplest and best definition of this indicator. FTP is often mistakenly equated with the anaerobic threshold, i.e. the intensity of effort at which the body stops effectively removing lactic acid and its concentration in the blood begins to increase. Indeed, FTP reflects a similar level of intensity, but it should be remembered that it is only a practical approximation of the anaerobic threshold, which can be estimated without laboratory tests.
How to check your FTP?
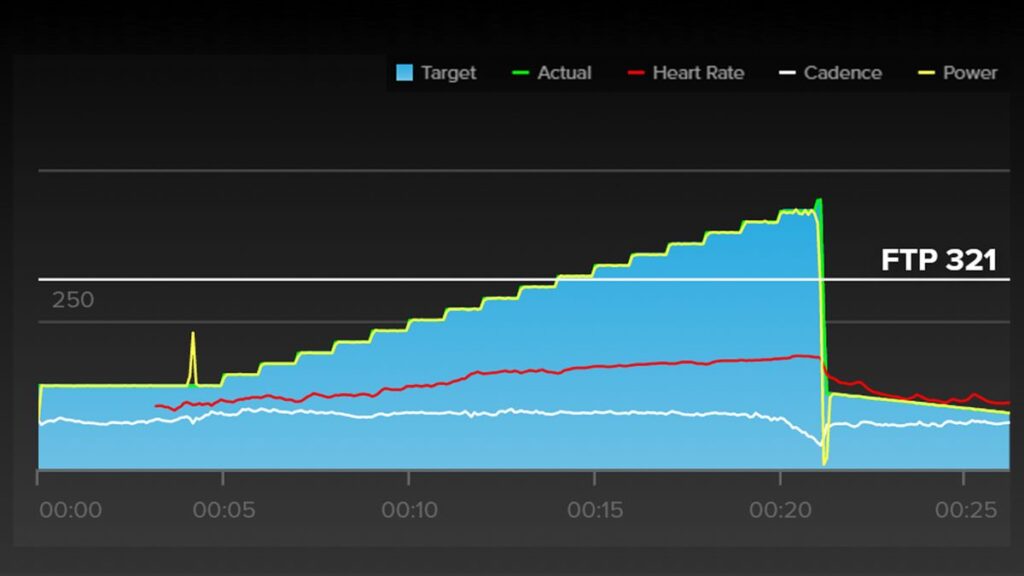
At the beginning, it is worth performing a test to determine your FTP value. Under ideal conditions, you could attempt an hour-long effort at your maximum possible average power, but in practice this is a huge challenge – both mentally and logistically. It is difficult to find a route that would allow you to ride without breaks for a full 60 minutes. For this reason, shorter methods are most often used, which allow you to estimate your FTP with sufficient accuracy. The most popular of these is still the 20-minute test – riding at the highest possible, steady power for 20 minutes. The average power from this segment should then be multiplied by a factor of 0.95, which will give us an approximate FTP value. Alternative methods include the ramp test, the 2×8 minute test, and simply analysing data from training sessions and races (power curve). However, to start with, I definitely recommend the classic 20-minute test – simple, proven and sufficiently accurate when starting your adventure with power meter.
Intensity zones.
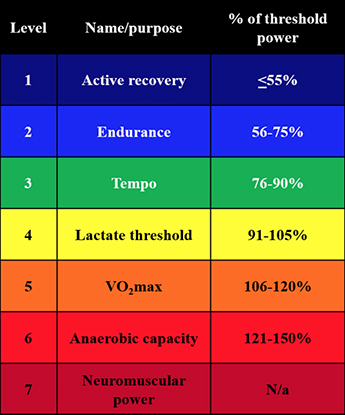 Zone 1 – active recovery (up to 55% FTP)
Very light effort, mainly used for recovery after intense training sessions. The physiological goal is to improve circulation, remove metabolic waste products and support biological regeneration processes without putting additional strain on the body.
Zone 2 – aerobic endurance (56–75% FTP)
This is the basic range for building general endurance. Aerobic processes dominate, and the body learns to use fats efficiently as a source of energy. The goal is to develop aerobic capacity and adapt the cardiovascular system to prolonged exercise.
Zone 3 – pace (76–90% FTP)
An intensity range between endurance and FTP threshold. Improves the body’s ability to work at moderate lactate concentrations. The physiological goal is to develop tolerance to prolonged moderate-intensity exercise and improve muscle efficiency.
Zone 4 – FTP threshold (91–105% FTP)
The main goal is to increase the body’s tolerance to threshold effort. The body learns to buffer lactate more effectively and work longer at the metabolic equilibrium limit without rapid fatigue.
Zone 5 – VO₂max (106–120% FTP)
Short, intense effort leading to maximum oxygen uptake. The goal is to improve the aerobic threshold (VO₂max), i.e. the body’s maximum ability to transport and utilise oxygen in muscle work.
Zone 6 – anaerobic (121–150% FTP)
Very intense intervals lasting from several seconds to 2 minutes. Anaerobic processes dominate, and the main goal is to increase anaerobic power and capacity and improve the ability to generate high power despite increasing fatigue.
Zone 7 – neuromuscular (above 150% FTP)
The highest intensity range – very short sprints and maximum efforts lasting up to several seconds. The physiological goal is to activate motor units with the highest excitability threshold, improve speed, peak power and neuromuscular coordination.
How to train at specific intensities?
For each intensity zone, there are specific training recommendations that specify: the duration of individual repetitions, the length of rest breaks between them, and the total time spent in a given zone within a single training session. The recommendations are based on physiological mechanisms related to muscle contraction energy, dominant metabolic systems, and the body’s ability to regenerate energy resources. Adhering to these principles allows for precise targeting of training adaptations.
Zone 1 – active recovery
Exercise time: 30–80 minutes
Continuous riding, no repetitions.
Zone 2 – aerobic endurance
Exercise time: 1–6 hours
Continuous riding, no repetitions.
Zone 3 – pace
Duration of one repetition: 10-60 minutes
Rest breaks: 3-20 minutes
Suggested total time spent in a given zone per training unit: 30 minutes – 3 hours
Sample training: Warm-up – 20 minutes at 60–65% FTP. Main part – 3×15 minutes in the pace zone/5-minute breaks at 30–50% FTP between repetitions, followed by 60–70% FTP after repetitions. Cool down – last 5 minutes of riding at 40-60% FTP
Zone 4 – FTP threshold
Duration of one repetition: 10-20 minutes
Rest breaks: 3-10 minutes
Suggested total time spent in a given zone per training unit: 30-60 minutes
Sample training: Warm-up – 30 minutes at 60-65% FTP. Main part – 4×10 minutes in the threshold zone/4-minute breaks at 30-50% FTP between repetitions, followed by 60-70% FTP after repetitions. Cool down – last 5 minutes of riding at 40-60% FTP
Zone 5 – VO₂max
Duration of one repetition: 3-8 minutes
Rest breaks: 3-8 minutes
Suggested total time spent in a given zone per training unit: 15-30 minutes
Sample workout: Warm-up – 30 minutes at 60–65% FTP. Main part – 6×4 minutes in the VO₂max zone/4-minute breaks at 20–50% FTP between repetitions, followed by 60–70% FTP after repetitions. Cool down – last 5 minutes of riding at 40-60% FTP
Zone 6 – anaerobic
Duration of one repetition: 30 seconds – 2 minutes
Rest breaks: 2-8 minutes
Suggested total time spent in a given zone per training unit: 2-12 minutes
Sample training: Warm-up – 30 minutes at 60–65% FTP. Main part – 8 x 1 minute in the anaerobic power zone/5-minute break (very gentle pedalling), after repetitions, increase to 60–70% FTP. Cool down – last 5 minutes of riding at 40-60% FTP
Zone 7 – neuromuscular
Duration of one repetition: 5–15 seconds
Rest breaks: 3–10 minutes
Suggested total time spent in a given zone per training unit: 30–90 seconds
Sample training: Warm-up – 30 minutes at 60–65% FTP. Main part – 8 x 10 seconds sprint max 5 minutes rest (very calm pedalling), after repetitions tighten to 60–70% FTP. Cool down – last 5 minutes of riding 40–60% FTP
At the end of this thread, it is worth noting that training units should be selected according to basic training principles, such as gradual progression of loads, individualisation and periodisation.
Basic terms for training with power meter.
Finally, I will present a few basic terms that are essential for the proper interpretation of training data. These terms appear in almost all devices and applications used to monitor and analyse each training session. For a better understanding, it is worth mentioning that every training process is based on three basic variables: volume, intensity and density. It is their appropriate combination and modification that allows for effective planning and control of the training process.
Volume is the total duration of the training session. Intensity is the power generated in relation to our individual training zones. Density is the frequency of training units.
The following indicators, usually presented in numerical form, reflect these three pillars of training and help to analyse them accurately.
AVG (Average Power) – average power generated during the entire training session or part of it. It does not take into account fluctuations in intensity – it treats the ride as uniform, which can be misleading in the case of training sessions with varying levels of effort.
NP (Normalized Power) – normalised power, which better reflects the actual physiological load than the average. It takes into account the variability of intensity during riding. When NP is significantly higher than AVG, it means that the training was highly interval-based or uneven.
IF (Intensity Factor) – Tthe intensity factor, i.e. the ratio of NP to FTP. It shows how intense the training was in relation to individual capabilities. For example, IF = 1.00 means an hour of effort at FTP level, IF = 0.65 means a relaxed aerobic session.
TSS (Training Stress Score) – Total Training Load indicator, which combines duration and intensity (IF). 100 TSS corresponds to one hour of riding at FTP. The TSS value helps to assess how much effort was expended and is used for long-term training planning.
PW:HR (Power to Heart Rate) – heart rate drift index, i.e. the relationship between power and heart rate during exercise. Most often used during longer, steady-state workouts (e.g. in zone 2) to assess whether the body maintains a stable heart rate response at a constant power output. An increase in heart rate at the same power (i.e. positive drift) may indicate fatigue, dehydration or poor aerobic base. A drift value below 5% is considered good aerobic exercise tolerance.
Is that all you need to know about power training?
This is enough to get you started. In this article, I have presented the most important basics without delving into more complex concepts or advanced training solutions. However, it is worth noting that at a certain stage of athletic development, relying solely on FTP may no longer be sufficient for further progress. A good direction to take then may be to use zones based on the power curve (iLevels – individualised power levels), which better reflect the individual characteristics of the athlete – their strengths and weaknesses – and are more precisely tailored to the physiology of a specific person. However, these are issues that will be useful mainly for more advanced cyclists. In this article, I have focused on solid foundations that will be more than sufficient for beginners.
AI-based training plan
An AI-based training plan is a great tool for beginners. The training platform offered by Inpeak – AiTrainer – is a tool that will help you structure and plan your training according to your abilities. The algorithm ‘learns’ about you and adjusts the load to your current fitness level. It is sensible and safe. Additionally, when you purchase a power meter, you can train for free for the first 2 months.

